Rabu, 03 November 2010

HomeGoods Mom Cave (Giveaway!)

Oooooh…I’ve been so excited about this one! I have a FAB giveaway for you today -- I’ve been chomping at the bit to tell you about!

HomeGoods has a Mom Cave promotion going on right now that you may have heard about around blogland. I don’t care who you are…young, old, work outside or in the home, one child or seven, children or not…every woman needs a spot they can go and just relax. Recharge. Regroup. Cause we make our worlds go round. We do – you are the glue in your household.

And being the glue gets tiring. :)

HomeGoods worked with the talented interior designer Elaine Griffin to come up with four essentials of the Mom Cave:
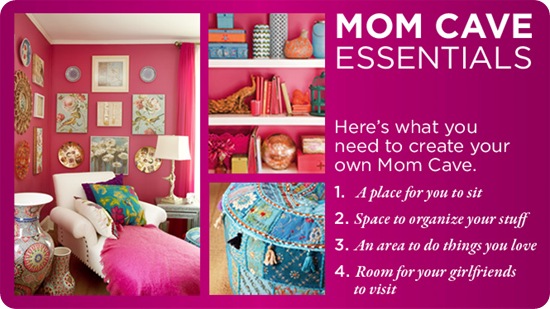
mom-cave-essentials Sounds good to me! Love it!

Thanks to HomeGoods, I was able to work on my own itty bitty Mom Cave. If you haven’t been to HomeGoods (or TJMaxx) – you. must. go. If you live near one, it is your duty as an American to check out the deals!! At least that's the platform I would run on…

You’ll find just what you were looking for and just the thing you didn’t know you were looking for.

You know I adore their lamps:

See all those drum shades? Swoon. The most expensive lamp I’ve ever purchased there was $50, but most are $30 each. For the selection, quality and the fact that they come with a shade – it’s hard to beat those prices. Lamps are pretty affordable most places, but adding on that shade is what gets ya.

There’s aisle after aisle (after aisle) of mirrors and art:

And there’s always a TON of furniture. I saw these two upholstered headboards the day I was there and thought they were lovely:


If you’ve been to HomeGoods, you know that doesn’t even scratch the surface. If you’ve never been but hear us bloggers go on and on (and on) about HomeGoods, you know that doesn’t even scratch the surface. ;)

We have a little spot in our master bedroom that has turned into my own little Mom Cave over the years, and this is what it looked like for a long time:

Ahhhhhh…the shiny brass is blinding me!!!!

Sorry…I couldn’t resist. :)

I thought this spot could use some warming up, and I started with the table. I’d pulled that one from the basement forever ago, and because it’s meant to be an end table, it stuck out really far from the wall. I wanted to cozy it up a bit, so I searched for just the right table at HomeGoods…I found plenty, most in the $150-$200 range. I didn’t want to spend that much and figured I wasn’t going to find what I was looking for.

But then I saw this one…and the birds started singing:

Really…there was a bird in the store. It started singing.

I KID. I KID!!

The singing was in my head. :) I’ve been wanting to pull some metallic tones into the room and this is a lovely muted gold -- the metal has almost a faux bamboo look, and the top is a mirror.

It was exactly what I envisioned for the space…AND it was only $60! Score!

One of the reasons I love HG so (we’re tight, so I can call them HG) is their selection of look-a-likes from more expensive stores. If you stalk browse Pottery Barn catalogs like me, you may have seen this pretty clock:

Well, at $39 it’s just a teensy out of my comfort zone for a little clock…but HomeGoods had a lovely version (I think it’s even bigger than the PB one?) for $15:

And dare I say – I like this one even better?

If I had my way and a few extra hundred bucks a month, I’d have fresh flowers all over our house at all times. But I don’t so I don’t, but I hope to treat myself as often as I can here:

They smell ahhhmazing! Oh, and the “vase” is really a sundae glass. :) Isn’t it so cute as a vase? Love it!

For the past few months, I’ve found myself sitting in this spot every morning to put on my makeup, so I added a box I already had (it was supposed to be a jewelry box) and put my everyday makeup in it:

Since the table had empty space underneath, I found a beautiful storage box at HomeGoods to hide magazines:

It was $16 and I love the hint of gold metallic on it – ties in perfectly with the table!

I initially tried the old lamp on the table, but I was still running into the same issue I’ve had – the light was just too low to read by (or to put make up on). So I stole a floor lamp from the office and it’s the absolute perfect height:

IMG_1282

I think floor lamps are so hard to pick out -- I find most are way too tall. This one happens to be just the right height for this chair. I found the drum shade a few months ago at Goodwill and it looks great on this lamp. (Love that natural fabric!)

No Mom Cave is complete (at least in my world) without a spot to cuddle up. I grabbed a luscious blanket for $13 at HG:

Seriously -- $13?! You can’t beat it!

It looks lovely on my little $15 garage sale chair and clearanced pillow I already had:
IMG_1274

That chair is the one and only upholstered item I’ve ever bought second hand. I couldn’t get it out of my head when I saw it…and went back three times. The third time it came home with me. :)

Then it was on to the mantel…yes, we have a fireplace in our bedroom. No, we are not rich. Yes, it ROCKS. No, the fireplace was not my idea. When we built our house and sat down with the designer to pick out all of our “extras,” I was in full freak-out, hyperventilating mode by the time we got to the bedroom and hubs announced he wanted a FIREPLACE.

You have got to be kidding. I think I passed out for a few seconds…the dollar signs were giving my hives. But hubby talked me into it…and I am SO GLAD he did. It’s only a few dollars more a month on the mortgage anyway…right Dave Ramsey? RIGHT?!  :) (Don’t hate Dave…we’re paying it off with your guidance!)

Anyhoo, I wanted to keep the mantel simple, but also make it a bit more sophisticated. I took a platter we’ve had for years and tried it up there and loved it. LURVE. Then I found three candlesticks in various sizes at HomeGoods to give some height to the other side:


Those candles are totally fake by the way. No catching the art on fiyah. (You can see how I made the DIY art (with wallpaper!) here.)

I wanted to beef up my little photo wall a bit, so I got a couple more black frames, one for $8 and one for $6:

The photos are printed right off our computer onto plain computer paper. (No, I don’t even use photo paper most of the time!) I keep scraps of foam board and cardboard and use them for photo “mats” – I cut them to size, paint them the color of the wall and just center the printed photo on top.

El cheapo art. Photographs are 90 percent of the “art” in our house and that’s just how I like it. :)

The little mirror was a Goodwill find a while ago, and I had been using it as a tray till  now. The wall needed one more little something and it was perfect!

So my little corner of the world, that used to look like this:

Is now just a tad bit warmer and cozier with the addition of some metallics, some soft stuff and a couple more photos on the wall:

my mom cave

(I’m trying out the buffalo check side of the drapes by the way – not sure if it’s staying or not, but ooohweee, I love that print!!)

Of course, in my world, the “Mom Cave” is still surrounded by toys (that I pushed out of the picture) and my pile-o-crap in the corner:

But let’s focus on the relaxing part, shall we??:

Until tomorrow when there’s a cat sleeping in my chair, choo choo’s all over the table and fire trucks lined up on the floor. But I wouldn’t want my Mom Cave any other way. :)

So I have some AWESOME news for you Squeeeezies! I have FOUR $50 HomeGoods gift cards to give away! WHOOHOO! I told you this rocked. I did.

All you have to do is leave a comment. What would you use $50 for? A space for just you I hope! Cause you DESERVE IT! I don’t know you and really have no idea…but I’m going to guess you totally deserve it. ;)

(This giveaway will be open till Monday, the 8th at noon.)

**Disclaimer:  My love and gushiness of HomeGoods, their prices and their products is all my own. They do not ask me to tell you how much I love them. I just do. So I tell you. That is all.

Senin, 01 November 2010

Before and After Party: A private pantry

Hello there! Welcome to the Before and After Party for November! (Can you even believe it’s November?) I can’t wait to see what you’ve been up to! But first, I wanted to show you the pain-in-the-booty project that I am SO GLAD is done.

Remember the pantry door transformation I showed you?:

I was lucky enough to get this beauty for FREE with some help from an Amex Points promotion. But, like always, I saved some cash by installing it myself (with Dad’s help!).

It wasn’t the easiest project ever. Actually, it was really quite annoying. And the part I finished up this weekend didn’t help it’s cause. Sheesh!

I mentioned I wanted to cover the windows on the door with something – I originally bought window film -- but it wasn’t the texture I was looking for. (I ended up using it for the ghost in our foyer!)

So when I posted this project, a few of you mentioned you had used plain old contact paper to get the look I was going for. Bahhhrilliant!

I admit I was a little teeny tiny bit doubtful – I picked up some clear contact paper at Target, and when I got home I tore it open, I was expecting it to be perfectly clear.

Well…you Squeezies were right (I know, I should just believe) – it was exactly what I wanted! A very soft, hazy look – just enough to let light in, but block the view to the canned goods. :)

What you lovelies didn’t tell me was it was a TOTAL AND COMPLETE pain in the booty to install. Gah. OK, maybe you did. I may have blocked it out. 

I started with my supplies – not much needed:

I tried a few things, and the pan scraper worked best for this project by far! I cut out a piece of contact paper, slightly larger than the window pane. When I installed it, I used a razor to trim the contact paper so it would fit perfectly in the pane.

The problem was…1.) the contact paper is supersonic and I tried four razors and not one would cut it easily 2.) when I would push hard to get through the “paper,” the knife would grab at the painted trim around the panel and little itty bitty flecks of black paint were coming off and getting stuck under the plastic:

It was driving me batty. I tried everything possible, and finally gave up. I decided to just cut a piece that was the exact size of each window pane, so I wouldn’t have to do anymore cutting with the contact paper on the window.

It was a lot of trial and error. Lots of cutting, holding it up, cutting, holding it up, cutting, realizing I had cut it too small, starting over. :)

When I would finally get the right size, I’d make sure it was perfect one more time:

Then I soaked the window with window cleaner:

You can try to do this without soaking the window but you will realize quickly it’s next to impossible. :)

When it’s wet, you can move it around and make it fit just so:

Then use your scraper (or any flat surface) to push out the bubbles:

You’ll want a paper towel handy to soak up the cleaner as you go. Lots of pushing, wiping, pushing, wiping.

It took FOREVA. Mostly because I would cut it the wrong size, or scratch it when peeling it off the backing. I lost my mind a little more with each window pane. :) I think it took four days of me tackling it whenever I had a few minutes to tackle it. FUN stuff.

Did I mention I couldn’t use the same size cut out of the contact paper for every window pane? You’d think they were all the same size, but amazingly – NO. Most were just a tad different. How is that possible? Because it’s a Sarah project, that’s why. :)

BUT. Dare I say it…SO worth it!!

contact paper on windowsIt helps just a tad that I decluttered and moved some items around in the pantry:

I adjusted my little labels so they were centered on the shelves:

pantry labels

And I LOVE it.

But I wasn’t done yet. :) Remember how I wanted to light up the inside of the pantry? Dad and I talked and figured out how we’re going to do it – but for now, I rigged it up with an extension cord just to see how it would look:

rope lights in pantry

SWOOOOON. Exactly how I pictured it in my head all those years ago when this project first popped in my head. ;)

I used rope lights around the door frame to get the “glow” look. And now I can see to find my sour cream and onion chips at night:

Awwwww yeah. All is right in my world.  :)

**The instructions on the rope lights say to not put them in an area with no ventilation, as they get just slightly warm. I called the hotline on the package to confirm a pantry is OK, and the man on the phone had no record of the product number – the product they make – so he was zero help. But I have talked to two people experienced in wiring/lighting, and they said it’s absolutely fine. When the manual says the lights get slightly warm, they mean slightly warm.  :) 

The contact paper idea would be perfect for any smallish window where you want privacy but don’t want to block the light – for cheap! The roll was $5 and even with all of my mess ups, I barely used half of it. This would be a great solution for windows above tubs, sidelights by a front door – whatever!

So there’s my before and after for this month…I don’t have a before, before picture handy of the white door we had up initially, but here’s the new door unpainted:

Here it is painted:

And here it is all soft and purdy and lit up:

black pantry door

And here’s all of our food for the world to see before, and the softly lit after:

It makes even wire shelves look pretty. :) This wasn’t an easy project…but totally worth it. And only five bucks for the privacy! (Which, by the way, is WAY cheaper than the window stuff you can buy.)

I am one happy chick!! :)

It’s time to see your before and afters! Remember to only link to the specific post – not your blog. I’ll leave this open so you can link up till next week!

Link it up yo!

Minggu, 31 Oktober 2010

Share your Holiday Home

ACK! I am so excited! It’s time to start thinking CHRISTMAS!!!

Yahoo!!

YES, I know…Thanksgiving comes first. I love Thanksgiving as much as the next person…but November 1st really signals the start of the holidays for me. So I get to dream, swoon and plan for them starting today. :)

I am THRILLED to share a fun event some of my beautiful bloggy friends and I have thrown together – I guess you could call it the “progressive dinner” of blogland?:

Holiday_Home_Banner_2

YIPPEE!!!

It’s a series of linky parties, all holiday-based, all FUN. :) We’ll kick it off with Layla from The Lettered Cottage on Tuesday the 30th for a mantel party. Then Rhoda from Southern Hospitality will host the vignette party on the 2nd. Kate from Centsational Girl will follow with a crafty shindig December 7th. And I’ll finish up with my annual Christmas Tree Party on the 9th.

I know. I know. FUN!! I’m busting at the thought of it. :)

So start thinking about what you may want to link up! You’ve got plenty of time to get ready. :)

Have a great Monday! I’ll be back late tonight with the November Before and After Party.

Sabtu, 30 Oktober 2010

Autumn in Indiana

Hello there! Hope your Halloween weekend is going beautifully!

A couple of weeks ago, my Sis and I took a day off from the decluttering around here to take in some of the fall beauty around us. It was her last day before heading to her new job and my last day having her around all day. :( Sniff.

I do love being with her – I don’t just use her for manual labor. ;)

I’m so proud to be a born and raised Hoosier, and this time of year I am madly in love with Indiana. It’s quite beautiful. Most think we’re just flat fields – and we do have our fair share. But there’s more than corn in Indiana -- some really gorgeous parts too. :)

My Sis, the Bub and I started our day out by driving through one of our very favorite “drive by” spots – the Meridian Kessler area of Indy. We ooohed and ahhhed over the fantastic houses, and took some hi-I’m-not-crazy-just-obsessed-with-your-house pictures along the way:

IMG_0893We had to be fast and stealth-like so the owners wouldn’t call the cops on the crazy women taking photos. :)

Some were decked out for Halloween, and the Bub would alert us by screaming “STOP!! HALLOWEEN STUFF!!” at the top of his lungs and freak us out every. single. time.:

IMG_0874Some were just plain gorgeous with some simple mums:

IMG_0875 IMG_0880

IMG_0885

Some didn’t need much of anything – they were gorgeous all on their own:

IMG_0879     IMG_0884The addresses have been blocked to protect those who live in the gorgeous houses :)…

IMG_0887

  IMG_0888  

IMG_0891

Oh my. Grey siding, white trim, red door? LURVE.

Because it was such an amazing day, we decided to head over to what has quickly become one of my favorite spots in Indianapolis – Holliday Park:

IMG_0896

It’s a fantastic park – complete with a nature center, beautiful architecture and gardens, tons of (HUGE) playgrounds and trails that take you through some gorgeous sights, down to the White River:

IMG_0944

You can’t help but completely breathe it in. It reminds me of the camping trips we took almost every single weekend throughout the summer and fall growing up. The smell of wet leaves is seriously intoxicating.

No cell phones. No emails. Someday I’m going to take a fold up chair, hike down to the river to sit and just get lost in nothing.IMG_0936

What a great reminder to just STOP MOVING. Look around. Be quiet.

IMG_0962

It was a perfect day, spent with two of my very favorite people.

It gets me so bad when I think about how much his Aunt loves him:

IMG_0942

It makes my heart melt that our son is so loved by so many other people other than us. He is surrounded. :)

I had some fun with Picnik with this one:

IMG_09652That’s a framer for sure. :)

Hope you have a HAPPY and SAFE Halloween!!

The Before and After Party will go up Monday night! 

Kamis, 28 Oktober 2010

So cheap it’s scary

IMG_1147

Can you believe Halloween is just days away? The days are going by SO FAST! I’m so excited for Monday though – November 1st is the first day I really allow myself to start thinking about Christmas. And I have a fun holiday event I’ll be announcing on Monday that you won’t want to miss! ;)

So anyway, we’ve had Halloween all over the place for a while now, but I’ve let the Bub kind of take over. I tried putting things out just so…and that lasted about ten minutes. What can I say – he’s like his Momma and is crazy about the holiday decor! I’m not going to fight it. :)

I’m so proud!! Sniff.

I’ve had the buffet in the foyer decked out for weeks now, but today the Bub and I finished it up with a little somethin’ somethin’ on the walls.

When we started working on that spot, our bright, fun lamp (consignment find) wasn’t looking so spooky. :) I wanted to Halloween-it-up a bit without having to do anything permanent.

We found some super cute downloads from the Silhouette site and used them to dress up the lamp shade a bit:

IMG_1143ACK! Are you dying? I adore these little guys.

I just gave them a very light coat of spray adhesive and stuck them on the inside of the lampshade:

IMG_1144 IMG_1145 

They were cut out of black card stock, and if you don’t have a craft cutter, you could easily download designs and cut them out. You may want to just find spiders with thicker legs if you are cutting them out by hand. :)

I love them so much! And how about snowmen for Christmas? Or snowflakes? DYING.

I finally made it back into Goodwill a couple of weeks ago, after a loooong time away. I found a $2 vase that was perfect for my Halloween “tree”:

IMG_1168

I filled it with some Dollar Tree netting, then grabbed some sticks from outside, spray painted them black and just stuck them in.

I know…I think I’m the last blogger on earth to do this. :) I wanted something with lots of height and it was perfect! I added some of my Pier 1 spiders ($1.50 for ten I think?) here and there, and some foamy bat stickers we had:

IMG_1154

The Spooky sign was from a couple of years ago and is just a $1 word mounted on Halloween paper, in an old frame:

IMG_1167

We couldn’t resist another spidey on the platter. :)

I found some sparkly spray paint on a recent trip to True Value, and knew I had to use it somehow:

Don’t you love that name – Titanium Silver? The little skull above was from Michael's and is a cardboard texture. A little Titanium and he was ready to go!

Our other skull head friend was an ugly plastic guy from the Dollar Tree, and because he was slick plastic, he got a coat of spray primer (also thanks to True Value!) and then a couple coats of the Titanium:

IMG_1170

I propped him up under a cloche and wrapped my cute beady stuff around it. Doesn’t he look so happy now? He’s positively beaming. ;)

The pumpkin was another cardboard-y thing from Michael's. I really wanted to use one of the Funkin pumpkins, but this little guy was only a couple of bucks – way cheaper! I sprayed it white and attached some strips of black gems in the grooves(a buck on clearance!):

IMG_1180

Our final project today was to add the bats flying off on the wall:IMG_1182

I cut out the ghost (by hand) out of window film I bought forever ago for the new pantry door. (You may remember it took me about six months to get that baby up.) I didn’t like it’s texture though – too bumpy for what I wanted. But perfect for a ghost in the mirror! Buwahahaha!! I love him!

We used the Silhouette to cut out the bats, but again, these are so easy to cut out on your own! I just stuck them to the wall using tape:

IMG_1163

I plan on keeping all of these – I think they’ll hold up another year easily!

We love our spooky foyer!:

IMG_1174

The best part – the whole thing was less than $10!

The cut outs are my favorite part by far…I’m so excited to do even more with them next year. ;)

Are you working on any last minute Halloween decorating or crafts? We’ve got a couple more little projects to work on over the weekend. That’s what the Bub tells me anyway. :)

For more Halloween goodness, click here for past projects!


*I was one of the bloggers selected by True Value to work on the DIY Squad. I have been compensated for my time commitment to the program as well as my writing about my experience. I have also been compensated for the materials needed for my DIY project. However, my opinions are entirely my own and I have not been paid to publish positive comments.*

Giveaway winners!

Hello there! I wanted to make sure to announce the winners from the TWO fabulous giveaways last week!

The winner of the Holiday with Matthew Mead “bookazine” is Heather at rcadenhead (at) gmail (dot) com.

Remember if you’d like to order your own copy, you can do that here.

The winner of The Rusted Chain giveaway is Amy from The Hay House! 

Congrats to both of you!

Send me an email at thriftydecorchick (at) gmail (dot) com and I’ll get you hooked up with your items. YAY! I’ll be back shortly with some last minute Halloween. :)